Showing posts with label DIY. Show all posts

Saturday, February 7, 2015

Now I have it over a barrel!


So I wanted to go outside with my gardening this year and decided to put together a small aquaponic system.

Since we are still renting I wanted it to be modular and easy to move.
I wanted a small footprint, but I wanted to be able to grow some bigger veggies.  

My mom had four blue barrels she had given to me from when my stepfather was planning to do an aquaponics system. One of the barrels was even already cut open on one side so that it would make a nice tank.  My step father had been planning to cut the barrels vertically and make the more traditional clamshell style grow beds, but I didn't want the extra cost and fuss with having to make a rigid frame to keep the sides from bowing out.  I had even been thinking about cutting the ends into shorter tubs and making a vertical garden more like my indoor garden is configured.  But in the end I decided with the extra cost of the much bigger PVC  needed for building towers, and the fact that I really wanted to be able to plant larger plants so I wanted open space above the growing beds.  

So now back to thinking about my design considerations, if I go with the clamshell design I get almost twice as much grow area but then I would still have to build a rigid frame.

If I cut the barrels in half horizontally then I'll only end up with about six square foot growing area using both halves......  unless I used the sides too! 

I had previously seen a few projects where people had cut pockets in the sides of barrels and made Garden Towers or by adding sprinklers inside and making it into a aeroponic system.  By putting in the pockets I am adding an additional 9 square feet to each half of the barrel, giving me a total growing area of 24 square feet, quadrupling my grow area.  

Nice, I think I'm good with that!

And I still have two more barrels I can add in.  

So what do you think?

Thursday, August 7, 2014

For my second trick (build)...a learning experience.

For my second trick (build) my design concepts were still fairly simple.  I wanted to use a piece of PVC as a central column so the water tube would not be as visible.  I wanted to use cheap containers as bowls for growing the plants.  I wanted to be able to adjust the bowls up and down to accommodate various plant heights.  

For the pipe I started out with 5 feet of 1/2 inch CPVC, it is stiffer than regular irrigation type PVC and is commonly used for potable water lines.  I drilled a small hole in the side of the pipe about 3 inches from the bottom to attach the airline to.  I pushed a 1/4 inch barbed connector into this hole.

To secure the bowls to the pipe I used 6 - 5/8th inch couplers that normally are used to connect black poly irrigation lines together.  These fit very snuggly onto the pipe and yet I was able to move them up and down as I needed to.

Next for the plant holders I was in a bit of a hurry so I used some storage containers I had around .  Actually I had the Walmart brand of these but any plastic containers could be used, even margarine or Cool Whip bowls.   I drilled a 5/8th inch hole in the center of the bottom of the bowl and four smaller holes outside of that, about halfway to the edge, for drains.

Next I use a bucket I had on hand that came from some dry cat food that we feed the cats.  I drilled two 5/8th inch holes in the center of the lid for the bucket.  The two holes were overlapping so I had room for both the pipe and the airline to pass through the lid.


Next I assembled the pieces to look like the photo above.  I filled the bucket with water and hooked up the airline.  Nothing,  the water was not rising all of the way to the top.  Hmmm,  if you count the bowls in the photo you will see there are five bowls.  I started with out with six bowls but it was a bit taller than the original build.  So I deleted one of the bowls and cut the pipe down to 52 inches to match the height of the first build.  So now when I put the bowls back on and tested it again.....it still did not push the water out of the top.  My guess is that the 1/2 inch CPVC pipe is just a bit too wide for this height but I think that water was going part way up.  But my next thought was to see if the 5/16th inch vinyl tube would fit inside of the pipe.  It did, a nice snug fit.  So I slipped enough of the vinyl tubing down inside the pipe to go down as far as the air connection.  Started it again and.... Now it works.  Now I am getting a nice flow of water out of the top.    

Now it is time to add some plants :-)

Ok, new problem.  for now I am using some lava rocks as porous lower layer in the bowls.  As I added the lava rocks into the bowls I was seeing that the weight of the rocks was bending the column over a bit. 

Looks like this design with a 1/2 inch CPVC pipe is not going to be stable enough without some supports.   So to get more support, I cannibalized the trellis from the first project and attached it to a smaller reservoir.  I just used some zip ties and  packing tape to make the attachments for now.

Ok, learned a lot from this build.

....I'm off and running on design number three already.  It is most elegant and is probably very close to what I am looking to have as my final design.  

I will try and write it up in a couple of days.

Do you have any questions, suggestions or comments?  
Add them to the comments below!


Wednesday, August 6, 2014

Here is my first cold brew system.


Here is my first cold brew system.  It is really easy to make. No screws, no glue, no tools needed.  And you may have everything you need already.  The  Rubbermaid Pitcher is easy to come by at probably every grocery stores in the country.  I saw it the other day at Walmart for under three dollars.  And the paper filters are cheep also at 100 for a dollar at the Dollar Store.


Now that you have your concentrate you can drink it straight for that morning jolt.
Mix it with about an equal part of water and heat it in the microwave to get a delicious cup of hot coffee.  Or mix it with water or milk and pour it over ice for really great iced coffee.

Give it a try and have some fun.

Let me know what you think about it in the comments below.

It looks like Walmart may have the better price but here is a link to Amazon for the Rubbermaid Pitcher and Filters.

Thursday, July 31, 2014

Hydroponics has always been....

Hydroponics has always been one of those ideas that I have been interested in.  Even as far back as my college days I had found a book called "Back to Basics: How to Learn and Enjoy Traditional American Skills" that was published by Reader's Digest back in 1981.  This is probably one of the classics for showing "How it is made" back before the internet or even cable TV.  This book is an interesting look at techniques for rustic living, including a section on farming/gardening techniques using Aquaponics.

If you can find a copy of this book I can highly recommend it as a idea generator for DIY projects that can be fun and productive.

When my wife and I bought our first house there was already a nice sized garden area with borders made from old railroad ties.  Probably not a recommended material these days with there creosote impregnation and all.  But I had my first garden.  The lot had flood irrigation so there was little need to think much about a watering system.  We got a foot of water every month, twice a month in the summer.  This was actually a fairly good system that has been in use here in Phoenix since the days of the Hohokam Indians.  In fact some of the same irrigation ditches are still in use today.

This garden was very productive for the 10 years we lived in that house.

Our second house didn't have a garden when we moved in but there was an old scraggly climbing rose hedge along the north wall.  While cutting it down I found that it too was inside a railroad tie border.  This area was a bit smaller than my previous garden, but it was 4 foot wide by 50 foot long.  There was no flood irrigation for this yard so I installed a new drip irrigation system for that area.  The only problem now was a big tree in the neighbors yard that overhung into my yard quite a bit.  But then again it probably helped in the summer by shading the garden from the hot sun.  I also started to do some container gardening on the patio,  also hooking these pots into the drip system.  So life was good.

Until the economic downturn that is.  My work got slower and slower till they finally had to dissolve the department I was in.  We ended up doing a short sale on our house and rented a smaller house in a cheaper neighborhood in Phoenix.  Though I have a backyard I have never felt I could dig it up and put in a garden.  I guess I could go with a container garden but I just haven't felt that spark to get it going either.

My Stepfather who passed away a couple of years ago had been working on designing and building an Aquaponics system before he died.  He was using 55 gal food grade barrels to make up the components for his system.  I was intrigued but did not really have the room to do something that elaborate in my old yard.  And the landlord probably wouldn't approve here either (lol).

But then I saw a Ted Talk from a lady that is making something called WindowFarms.


Here Britta Riley is using plastic water bottles to make a vertical garden.  Wow this system is so simple it is amazing.  Being a do it yourself type person this got my creative juices flowing again. 

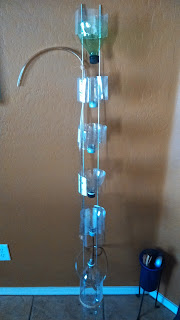
For my engineering prototype I decided to use 2 liter bottles instead of the smaller water bottles.  I cut the top cone off and a 3in section of the body.  I used the 3 in section as sort of a cup holder to hold the cone inverted to hold the plants.  I used packing tape to tape the holder to a piece of wire reinforcement for building block walls.  I punched a hole into each of the lids so the water could drain out into the next plant.  with the bottom lid I pushed a 1/4in barb into it so I could attach a short piece of hose to direct the water into the water reservoir.
I had some 5/16in food grade tubing that I used when making homebrew beer.  I punched a hole into it and pushed another 1/4in barb into it a few inches up from the bottom to make the water lift system.

Note: If your air pump is lower than the level of water in your reservoir then you should also add a check valve in the air supply line to keep water from syphoning out into your pump.


The only two things I bought specifically for this project was the air pump at PetsMart for $27 and the reinforcement wire at Home Depot for $1.77.  Everything else I had on hand.

In retrospect it would have been a lot cheaper to have waited and ordered the Air Pump from Amazon.


It may not be the prettiest but it does work :-)


Have any questions or comments use the comments section below.
Also if I have helped or inspired you in anyway you can help me by  buying  your planting needs through my Amazon Store.

Popular Posts